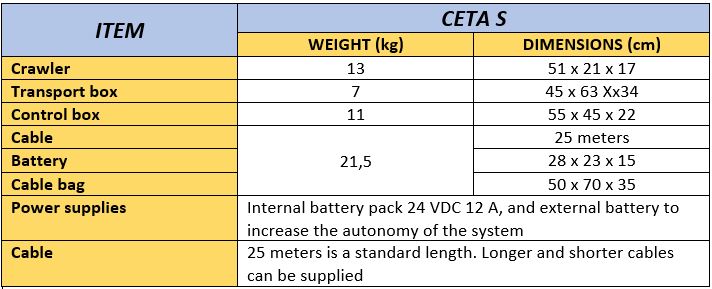
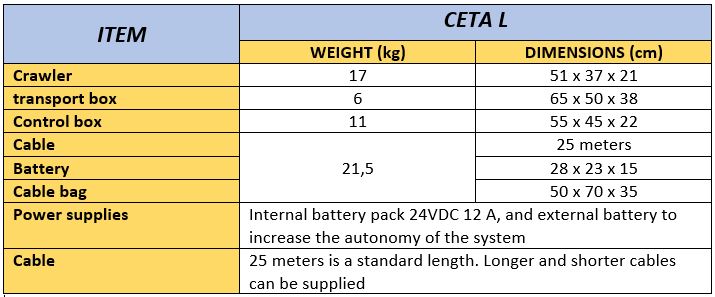
CETA wall crawler is one of the latest generation of storage tank wall crawlers supplied by Tecnitest Ingenieros S.L. The system is suitable for scanning walls of large storage tanks, using ultrasonic inspection to map the thickness profile of the tank wall from the outside using for that a control box to remotely control the crawler. The system can therefore meet the requirements of API 653. The CETA has the ability to move over riveted plates that can be encountered in various sites around the world. Furthermore, the design is such that it can be manoeuvred around other obstacles easily using the controller.
CETA wall crawler is one of the latest generation of storage tank wall crawlers supplied by Tecnitest Ingenieros S.L. The system is suitable for scanning walls of large storage tanks, using ultrasonic inspection to map the thickness profile of the tank wall from the outside using for that a control box to remotely control the crawler. The system can therefore meet the requirements of API 653. The CETA has the ability to move over riveted plates that can be encountered in various sites around the world. Furthermore, the design is such that it can be manoeuvred around other obstacles easily using the controller.
Reliable automated inspection of storage tank walls for corrosion degradation
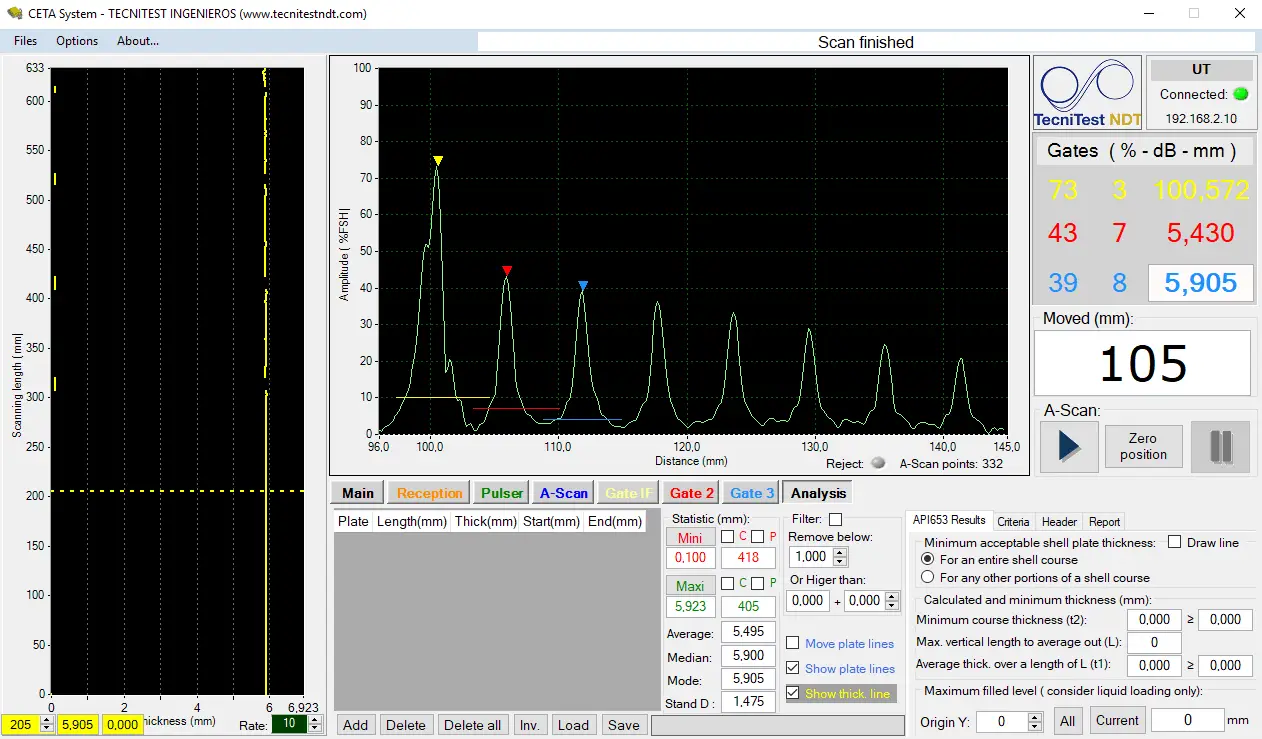
Software functionality gives thickness readings every 1 mm throughout the inspection
Software performs automatic data capture and positioning
Complete Scan ‘A’ scans are automatically stored in a database for recording and re-call.
Outstanding manoeuvrability at speeds of up to 200 mm/s
Independent drives on each main wheel
The CETA system operates with a single crystal wheel probe transducer having a frequency of 5 MHz or 10 MHz.
The wheel probe is virtually dry contact, there is a water reservoir on the carriage, which feeds a sponge, to dampen the wheel as it moves over the inspection area.
A Multi-element Transducer is also available with up to 6 probes in a larger wheel.


 The data acquisition system allows high speed movement measuring thicknesses every 1 mm with accurate control of position and measurement accuracy better than 0.1 mm. All A-scans are stored for future analysis and a B Scan presentation is provided from the A scan data. Acquired data are recorded and properly presented on the system PC with automatic evaluation… specifically, the series of thickness values is shown in a two axis graphic format (distance to the reference position versus thickness or thickness loss) and referenced to the input nominal value of each plate and the 20%, 40% and 60% remaining thickness, allowing image scrolling, zoom.
Post scanning data processing is available with a full suite of post processing tools including adjustment and addition of gates. Post inspection report generation in Excel, Word or PDF.
The dedicated software of the system allows as well signal filtering and data processing to erase false or deviated measurements (user defines thresholds), calculation of average values within a user defined range and, according to API-653 Specification for the inspection of oil storage tanks, the calculation of actual minimum acceptable thickness and maximum allowable tank capacity.
subscribe to receive promotions and offers, and download the content
You have successfully subscribed to the newsletter
There was an error while trying to send your request. Please try again.
Thanks for your download!
SAVE CLOSE THIS MESSAGE AND CLICK THE PDF YOU WANT TO DOWNLOAD, WE ARE HAPPY TO BE ABLE TO OFFER WHAT YOU WERE LOOKING FOR